Difference between revisions of "AY Honors/Digital Photography/Answer Key/es"

From Pathfinder Wiki
< AY Honors‎ | Digital PhotographyAY Honors/Digital Photography/Answer Key/es
(Created page with "{{clear}}")
 
(54 intermediate revisions by 2 users not shown)
Line 1: Line 1:
<languages /><br />
+
{{HonorSubpage}}
<noinclude></noinclude>
 
{{honor_desc/es
 
|stage=00
 
|honorname=Fotografía digital
 
|skill=2
 
|year=2006
 
|category=Artes y actividades manuales
 
|authority=Asociación General
 
|insignia=Digital photography.png
 
}}
 
  
<noinclude></noinclude>
 
<section begin="Body" />
 
<noinclude></noinclude>
 
==This honor has also been adopted by the South Pacific Division with the same requirements but under the name Photography (Digital) 1.==
 
 
<noinclude></noinclude>
 
 
{{ansreq|page={{#titleparts:{{PAGENAME}}|2|1}}|num=1}}
 
{{ansreq|page={{#titleparts:{{PAGENAME}}|2|1}}|num=1}}
 
<noinclude></noinclude>
 
<noinclude></noinclude>
Line 23: Line 7:
 
{{ansreq|page={{#titleparts:{{PAGENAME}}|2|1}}|num=1a}}
 
{{ansreq|page={{#titleparts:{{PAGENAME}}|2|1}}|num=1a}}
 
<noinclude></noinclude>
 
<noinclude></noinclude>
 +
[[Image:Pinhole-camera.svg|thumb|right|200px|Principio de una cámara estenopeica. Los rayos de luz de un objeto pasan a través de un pequeño orificio para formar una imagen.]]
 +
Las cámaras funcionan con la luz del espectro visible. Una cámara generalmente consta de algún tipo de hueco cerrado, con una abertura en un extremo para que entre la luz y una superficie de grabación o visualización para capturar la luz en el otro extremo. La mayoría de las cámaras tienen una lente colocada frente a la abertura de la cámara para recoger la luz entrante y enfocar la imagen (o parte de la imagen) en la superficie de grabación. El diámetro de la apertura a menudo se controla mediante un mecanismo de diafragma, pero algunas cámaras tienen una apertura de tamaño fijo.
  
{{clear}}
+
Una [[esw:Cámara_digital|cámara digital]] usa electrónicos, usualmente un [[esw:Dispositivo_de_carga_acoplada|dispositivo de carga acoplada (conocido también como CCD)]] o a veces un sensor [[esw:Semiconductor_complementario_de_óxido_metálico|semiconductor complementario de óxido metálico (CMOS)]] para capturar imágenes que pueden transferirse o almacenarse en la memoria de la computadora dentro de la cámara para su posterior reproducción o procesamiento.
  
{{clear}}
+
Aquí hay [[esw:Cámara_digital#Métodos_para_capturar_las_imágenes|más detalles técnicos]] acerca de cómo se captura la imagen.
 +
<br style="clear:both">
  
 
<noinclude></noinclude>
 
<noinclude></noinclude>
Line 32: Line 19:
 
{{ansreq|page={{#titleparts:{{PAGENAME}}|2|1}}|num=1b}} <!--T:5-->
 
{{ansreq|page={{#titleparts:{{PAGENAME}}|2|1}}|num=1b}} <!--T:5-->
 
<noinclude></noinclude>
 
<noinclude></noinclude>
 +
[[File:Bayer pattern on sensor.svg|thumb|200px|Mosaico de Bayer de filtros de color mostrando su disposición de pixeles en un sensor de imagen.]]
  
{{clear}}
+
Un ''[[esw:Sensor_de_imagen|sensor de imagen]]'' es un dispositivo que convierte una imagen visual en una señal eléctrica. Se utiliza en cámaras digitales (así como en otros dispositivos de imágenes). Por lo general, es una matriz de dispositivos de carga acoplada (CCD) o sensores CMOS, como sensores de píxeles activos.
  
{{clear}}
+
Hay varios tipos principales de sensores de imagen en color, que se diferencian por el mecanismo de separación de color:
  
 
{{clear}}
 
{{clear}}
Line 63: Line 51:
 
<noinclude></noinclude>
 
<noinclude></noinclude>
  
{{clear}}
+
En las fotos a continuación, la cámara no se movió, pero la lente de la cámara se cambió como se indica.
  
 
{{clear}}
 
{{clear}}
Line 86: Line 74:
 
{{clear}}
 
{{clear}}
  
{{clear}}
+
{{clear}}
  
 
{{clear}}  
 
{{clear}}  
Line 166: Line 154:
 
<noinclude></noinclude>
 
<noinclude></noinclude>
 
<!-- 7. Tomar fotografías que muestren al menos 8 de las siguientes técnicas (utilizar fotografías comparativas para ilustraciones): -->
 
<!-- 7. Tomar fotografías que muestren al menos 8 de las siguientes técnicas (utilizar fotografías comparativas para ilustraciones): -->
''(algunos de estos detalles son copiados de la especialidades de [[Adventist_Youth_Honors_Answer_Book/Arts_and_Crafts/Photography/es|Fotografía]])''
+
''(algunos de estos detalles son copiados de la especialidades de [[AY Honors/Photography/es|Fotografía]])''
  
 
<noinclude></noinclude>
 
<noinclude></noinclude>
Line 199: Line 187:
 
{{clear}}
 
{{clear}}
  
'''Lighting:'''
+
{{clear}}
  
'''''Front lighting''''' is best when you want to see the details, like if you're taking a close-up of someone's face. A downfall is, that if the lights too bright, such as in the middle of the day, there might be "glare" in your subject.
+
{{clear}}
  
'''''Side lighting''''' is great for bringing out shapes and textures, such as a rocky mountain cliff or tree bark.
+
{{clear}}
These two photos are from Mono Lake In California. Notice how different the same rocks look depending on where the light is coming from?
 
  
'''''Back lighting''''' is lighting from behind the subject, tends to hide the subject, forming a silhouette. Some good places to use back lighting are a camporee flagpole at sunset, a cow/horse grazing at sunset, or a playground after everyone has gone home for the evening.
+
{{clear}}
  
<br style="clear:both">
+
{{clear}}
  
 
<noinclude></noinclude>
 
<noinclude></noinclude>
Line 214: Line 201:
 
{{ansreq|page={{#titleparts:{{PAGENAME}}|2|1}}|num=7d}} <!--T:73-->
 
{{ansreq|page={{#titleparts:{{PAGENAME}}|2|1}}|num=7d}} <!--T:73-->
 
<noinclude></noinclude>
 
<noinclude></noinclude>
*The best light conditions are 1 1/2 hours before sunset or the first hour after sunrise. The reason is that the light isn't SO BRIGHT that it washes out the colors in your picture, but at the same time the shadows are long (which makes side lighting pictures look extra special). Also, the sunset or sunrise gives off a kind of "pink" or "orange" light, which makes many nature pictures look very friendly & special. If you want to know when sunrise and sunset are going to be, check out www.adventist.org's sunset calendar!
 
*Be careful of evening shadows when photographing people. long shadows on faces hide features and expressions!
 
*Pictures taken during the middle of the day will be "stark" with hard lines and minimal shadows. Buildings & some landscapes such as mountains look especially regal or majestic during the middle of the day. Just remember that if you take a picture during the middle of the day, shade the top of the lens of your camera by placing one of your hands or a piece of paper horizontal about 2" above the lens to form a "shade for the lens. This will keep pink & blue "sparks" from showing up on your photos.
 
*When there is no sunshine (on a rainy day) don't give up on taking pictures! Zoom in close on flowers and other colorful objects. The color will be extra deep since its not being "washed out" by the sun. Fog which often accompanies soft rain also makes a very nice soft hazy look. Just be sure to protect you lens from specks of rain!


<noinclude></noinclude>
 
<noinclude></noinclude>
Line 223: Line 206:
 
{{ansreq|page={{#titleparts:{{PAGENAME}}|2|1}}|num=7e}} <!--T:74-->
 
{{ansreq|page={{#titleparts:{{PAGENAME}}|2|1}}|num=7e}} <!--T:74-->
 
<noinclude></noinclude>
 
<noinclude></noinclude>
<gallery>
 
Image:Meraner Berge.jpg|A photo divided into thirds
 
Image:PicoParana2006-3.jpg|Sky taking top two-thirds
 
Image:PicoParana2006-2.jpg|Sky taking top one-third
 
</gallery>
 
A Picture looks best when you imagine a tic-tac-toe board on top of your picture you're going to take. Remember that we're wanting a photo to look 3 dimensional! Part of that is arranging it in combination with "Framing" and "Leading Lines" techniques, but putting objects in "3rds" on the photo.
 
 
For example: In a mountain scene the landscape in the bottom screen--maybe even a tree or rock to help it look "more 3-D"-- the mountains in the middle 3rd, and the sky in the top third.
 
  
Another Illustration: If you're taking a picture of a landscape with puffy clouds, take one picture where 2/3 of the picture is composed of the clouds and the landscape fills the bottom 1/3. Then try with 1/3 clouds and 2/3 landscape. Notice how different this same landscape looks with the "3rds" changed from top to bottom!
+
{{clear}}
  
 
<noinclude></noinclude>
 
<noinclude></noinclude>
Line 238: Line 213:
 
{{ansreq|page={{#titleparts:{{PAGENAME}}|2|1}}|num=7f}} <!--T:76-->
 
{{ansreq|page={{#titleparts:{{PAGENAME}}|2|1}}|num=7f}} <!--T:76-->
 
<noinclude></noinclude>
 
<noinclude></noinclude>
<gallery>
 
Image:WashingtonDC Obelisk.jpg|Eye level example
 
Image:WashMonument WhiteHouse.jpg|High level example (looking down)
 
Image:98050934 Frankfurt Low Level.jpg|Low level example (looking up)
 
</gallery>
 
Subjects look different depending on where you are in relation to them when you take the picture.
 
  
You'll need three photos for this requirement, though they don't have to be of the same object. A High-angle, Mid-angle, and Low-angle photograph.
+
{{clear}}
  
'''''High angle means:''''' looking down on your subject
+
{{clear}}
  
'''''Mid-angle means:''''' looking at your subject straight on.
+
{{clear}}
  
'''''Low-angle means:''''' looking up at your subject
+
{{clear}}
  
For this requirement, take a subject, such as some tall straight trees, and take a picture looking straight at them, then another one by laying on the ground looking up through the trees. Did the angle make a difference?
+
{{clear}}
  
 
<noinclude></noinclude>
 
<noinclude></noinclude>
Line 259: Line 228:
 
{{ansreq|page={{#titleparts:{{PAGENAME}}|2|1}}|num=7g}} <!--T:82-->
 
{{ansreq|page={{#titleparts:{{PAGENAME}}|2|1}}|num=7g}} <!--T:82-->
 
<noinclude></noinclude>
 
<noinclude></noinclude>
<gallery>
 
Image:CaiMonVillage.jpg|Example of not level horizon
 
Image:CaiMonVillage-autolevel.jpg|Example of level horizon
 
</gallery>


<noinclude></noinclude>
 
<noinclude></noinclude>
Line 268: Line 233:
 
{{ansreq|page={{#titleparts:{{PAGENAME}}|2|1}}|num=7h}} <!--T:83-->
 
{{ansreq|page={{#titleparts:{{PAGENAME}}|2|1}}|num=7h}} <!--T:83-->
 
<noinclude></noinclude>
 
<noinclude></noinclude>
Have you ever taken a picture of a beautiful flower or some animals but when the photo came back, you had to explain to friends "that dot is a pretty rose," and "that dot over there is a buffalo."?


Filling the frame is all about making your subject (what you're taking a picture of) fill up most of the picture frame. This means standing closer to the subject than you're ordinarily used to doing and making sure there's not a lot of "green space" around your subject.
+
{{clear}}
  
  
'''Some ideas for Pathfinders:'''
+
'''Algunas ideas para los Conquistadores:'''
*Take a picture of your whole youth group. Be sure there are some standing and some standing/sitting in front of them. Then, get close enough so that there is almost NO "background green space" around them. You'll be impressed with how nice it is to have a photo that shows the expressions on everybody's face.
+
* Tome una foto de todo su grupo de jóvenes. Asegúrese de que haya algunos de pie y otros de pie/sentados frente a ellos. Luego, acérquese lo suficiente para que casi NO haya «espacio verde de fondo» a su alrededor. Le impresionará lo agradable que es tener una foto que muestre las expresiones en el rostro de todos.
  
*Take a picture of your best friend while they're eating at a campout or lockin. Don't try to take a picture of the whole room, but zoom in on their upper body and the top of the table with the plate of food. You'll both laugh when you see the photo that shows how shocked your friend was at your "surprise" picture.
+
* Tome una foto de su mejor amigo mientras comen en un campamentoo en otro lugar. No intente tomar una foto de toda la habitación, sino acerque la parte superior del cuerpo y la parte superior de la mesa con el plato de comida. Ambos se reirán cuando vean la foto que muestra lo sorprendido que estaba su amigo por su foto «sorpresa».
  
 
<noinclude></noinclude>
 
<noinclude></noinclude>
Line 283: Line 247:
 
{{ansreq|page={{#titleparts:{{PAGENAME}}|2|1}}|num=7i}} <!--T:87-->
 
{{ansreq|page={{#titleparts:{{PAGENAME}}|2|1}}|num=7i}} <!--T:87-->
 
<noinclude></noinclude>
 
<noinclude></noinclude>
[[Image:Washington March15 2003-01.jpg|thumb|right|200px|The path leads you to the monument]]
 
Leading lines are anything in a photograph that will help lead your eyes towards the main subject. For example, do you want people eyes to travel "down the road into the sunset, just like the bus is doing? Or, do you want people to see the big cafeteria on the hill where you and your fellow pathfinders ate all weekend?
 
  
Leading Lines also help your photograph's "depth." If your eyes are able to wander into the picture, then your brain will think the picture looks more real, like the real 3-D world we live in.
+
{{clear}}
  
'''Ideas for Pathfinders:'''
+
'''Ideas para los Conquistadores:'''
  
* Roads: take a picture of a windy road that leads to nowwhere; The road that leads to camporee or the road into the campsite you're staying at this weekend may also be a good leading line.
 
* Trails
 
* Fence Posts / Fence lines
 
* Tall buildings or tall trees. Take pictures straight up, and use those tall lines to guide your eyes to a Mountain peak, or to the sun / moon shining overhead.
 
<br style="clear:both">
 
 
<noinclude></noinclude>
 
<noinclude></noinclude>
 
{{CloseReq}} <!-- 7i -->
 
{{CloseReq}} <!-- 7i -->
 
{{ansreq|page={{#titleparts:{{PAGENAME}}|2|1}}|num=7j}} <!--T:90-->
 
{{ansreq|page={{#titleparts:{{PAGENAME}}|2|1}}|num=7j}} <!--T:90-->
 
<noinclude></noinclude>
 
<noinclude></noinclude>
<gallery>
 
Image:Underexposed.png|Example of Underexposed photo
 
Image:Sizilien Autobahn A29DIR.jpg|Example of Overexposed photo
 
Image:798px-Sizilien Autobahn A29DIR-autofixed.jpg|Autofixed photo
 
</gallery>
 
<br style="clear:both">


<noinclude></noinclude>
 
<noinclude></noinclude>
Line 310: Line 261:
 
{{ansreq|page={{#titleparts:{{PAGENAME}}|2|1}}|num=7k}} <!--T:91-->
 
{{ansreq|page={{#titleparts:{{PAGENAME}}|2|1}}|num=7k}} <!--T:91-->
 
<noinclude></noinclude>
 
<noinclude></noinclude>
[[Image:Hanimd.jpg|thumb|right|200px|Example of how the reflection of the flash can disrupt the photo]]
 
Most flashes should be used no closer to a subject than 6 feet. and more than 20 feet away. Any closer and it will "wash out" your subject, (depending on flash), and any farther away, the light won't even reach.  For example: Have you ever seen people use a flash at a football game, or in a large stadium in hopes of getting photos of the people on the field? The flash won't help because its too far away!
 
  
Don't try to use a flash when there is a reflective object directly in front of the lens. For example, a mirror or window behind your friends, or the fishtank glass between you and that shark at SeaWorld. Move off to the side diagonally a little, so that the light, when it flashes off the reflective object, won't bounce directly back to your lens, but instead will bounce into empty space beside you!
+
{{clear}}
  
Use the flash to fill in shadows. If your subject has side-lighting erasing the features on its face that you want to capture on film, use the flash to erase the shadows. BE SURE you're far enough away, or the whol picture will be blotted out!
+
{{clear}}
  
'''Some ideas for Pathfinders:'''
+
'''Algunas ideas para los Conquistadores:'''
  
*  Try using a flash when your friends are in a dark cave or room. Arrange them 6 feet away from your camera, then take 2 pictures. One with a flash and one without. Notice the difference. Now take one with your friend(s) only 3 feet away. What happened?
+
{{clear}}
  
*  At your next campout, just before sunset grab some friends and have them stand in front of camp, with the sunlight coming from one side, casting shadows on their faces. Take 2 pictures. One with fill-in flash, and one without. What was the difference?
+
{{clear}}
<br style="clear:both">


<noinclude></noinclude>
 
<noinclude></noinclude>
Line 329: Line 277:
 
{{ansreq|page={{#titleparts:{{PAGENAME}}|2|1}}|num=8}}
 
{{ansreq|page={{#titleparts:{{PAGENAME}}|2|1}}|num=8}}
 
<noinclude></noinclude>
 
<noinclude></noinclude>
<!-- 8. Learn how to place photos in PowerPoint. Create a PowerPoint presentation showing the pictures you took using the above techniques. -->
+
<!-- 8. Aprender cómo colocar fotografías en PowerPoint o en un programa equivalente. Crear una presentación mostrando las imágenes que se tomaron utilizando las técnicas anteriores. -->
  
Generally speaking, depending on your version of the presentation software, you follow the menu path: ''Insert'' -> ''Picture'' -> ''From File'', and navigate to the picture you want to place. After that, you can right click on the picture, and select ''Format Picture'' and do some changes.
+
{{clear}}
  
Do not feel constrained to using PowerPoint.  You can download OpenOffice for free from http://www.openoffice.org and use the ''Impress'' package that comes with it.  ''Impress'' can generate slides that PowerPoint can read.  OpenOffice is available for Windows, Mac, Linux, and other operating systems.
+
{{clear}}
  
 
<noinclude></noinclude>
 
<noinclude></noinclude>
Line 339: Line 287:
 
{{ansreq|page={{#titleparts:{{PAGENAME}}|2|1}}|num=9}}
 
{{ansreq|page={{#titleparts:{{PAGENAME}}|2|1}}|num=9}}
 
<noinclude></noinclude>
 
<noinclude></noinclude>
<!-- 9. Using a photo editing program on a computer, show ability to crop, color correct, sharpen, and adjust brightness/contrast to photos. -->
+
<!-- 9. Usando un programa de editar fotografías en una computadora, mostrar la capacidad de cortar, corregir el color, enfocar y ajustar el brillo/contraste a las fotografías. -->
Most modern photo editing software allows you to accomplish these tasks simply and quickly.  Adobe's Photoshop is probably the best known photo editing package, but you may wish to experiment with [http://gimp.org The Gimp].  It can be downloaded for free and runs under Windows, Mac, and Linux.


<noinclude></noinclude>
 
<noinclude></noinclude>
Line 346: Line 293:
 
{{ansreq|page={{#titleparts:{{PAGENAME}}|2|1}}|num=10}}
 
{{ansreq|page={{#titleparts:{{PAGENAME}}|2|1}}|num=10}}
 
<noinclude></noinclude>
 
<noinclude></noinclude>
<!-- 10. Complete at least three creative photographic projects in a photo editing program; such as a CD cover, a photo scrapbook page, a collage, etc. -->
+
<!-- 10. Completar al menos 3 proyectos fotográficos creativos en un programa de editar fotografías, tales como una portada de CD, una página de un álbum de fotografías, un collage, etc. -->
 
<noinclude></noinclude>
 
<noinclude></noinclude>
 
{{CloseReq}} <!-- 10 -->
 
{{CloseReq}} <!-- 10 -->
 
{{ansreq|page={{#titleparts:{{PAGENAME}}|2|1}}|num=11}}
 
{{ansreq|page={{#titleparts:{{PAGENAME}}|2|1}}|num=11}}
 
<noinclude></noinclude>
 
<noinclude></noinclude>
<!-- 11. Have a basic understanding of file organization techniques. -->
+
<!-- 11. Tener una comprensión básica de los métodos y las técnicas de archivo fotográfico. -->
[[W:file|File]] - A '''computer file''' is a block of arbitrary information, or resource for storing information, just a sequence of binary digits. At a higher level, where the content of the file is being considered, these binary digits may represent [[integer]] values or [[Character (computing)|text character]]s, or anything else. It is up to the program using the file to understand the meaning and internal layout of information in the file and present it to a user as a document, image, song, or program.
 
  
[[W:organization|Organization]] - An '''organization''' is a social arrangement which pursues collective goals, which controls its own performance, and which has a boundary separating it from its environment.  The word itself is derived from the Greek word ''ὄργανον'' (organon) meaning ''tool''. The term is used in both daily and scientific English in multiple ways.
+
{{clear}}
  
Put together, '''file organization''' asks that you understand how to organize files on your computer, on the bookshelf, etc. Do you place the files in some sort of established order? Alphabetically, by date? by subject?
+
{{clear}}
{{CloseReq}} <!-- 11 -->
 
  
==References==
+
==Referencias==
  
* [http://adventsource.org/efile.aspx?ID=35141 Requirements from efiles from Advent Source]
 
* [http://www.pathfindersonline.org/pdf/ayhonors/international/digital_photography.pdf Requirements from PathfindersOnline.org]
 
* [http://honours.adventistconnect.org/photography-digital-1 Requirements from SPD]
 
[[Category:Adventist Youth Honors Answer Book|{{SUBPAGENAME}}]]
 
 
<noinclude></noinclude>
 
<noinclude></noinclude>
<section end="Body" />
+
{{CloseHonorPage}}

Latest revision as of 15:03, 14 February 2022

Other languages:
English • ‎español
Fotografía digital

Nivel de destreza

2

Año

2006

Version

08.01.2025

Autoridad de aprobación

Asociación General

Digital Photography AY Honor.png
Fotografía digital
Artes y actividades manuales
Nivel de destreza
123
Autoridad de aprobación
Asociación General
Año de introducción
2006
Vea también


1

Explicar lo siguiente:


1a

¿Cuáles son los principios del funcionamiento de la cámara digital y cómo funciona una cámara digital?


Principio de una cámara estenopeica. Los rayos de luz de un objeto pasan a través de un pequeño orificio para formar una imagen.

Las cámaras funcionan con la luz del espectro visible. Una cámara generalmente consta de algún tipo de hueco cerrado, con una abertura en un extremo para que entre la luz y una superficie de grabación o visualización para capturar la luz en el otro extremo. La mayoría de las cámaras tienen una lente colocada frente a la abertura de la cámara para recoger la luz entrante y enfocar la imagen (o parte de la imagen) en la superficie de grabación. El diámetro de la apertura a menudo se controla mediante un mecanismo de diafragma, pero algunas cámaras tienen una apertura de tamaño fijo.

Una cámara digital usa electrónicos, usualmente un dispositivo de carga acoplada (conocido también como CCD) o a veces un sensor semiconductor complementario de óxido metálico (CMOS) para capturar imágenes que pueden transferirse o almacenarse en la memoria de la computadora dentro de la cámara para su posterior reproducción o procesamiento.

Aquí hay más detalles técnicos acerca de cómo se captura la imagen.


1b

¿Cuál es el efecto de la luz sobre el sensor de imagen?


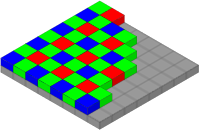
Mosaico de Bayer de filtros de color mostrando su disposición de pixeles en un sensor de imagen.

Un sensor de imagen es un dispositivo que convierte una imagen visual en una señal eléctrica. Se utiliza en cámaras digitales (así como en otros dispositivos de imágenes). Por lo general, es una matriz de dispositivos de carga acoplada (CCD) o sensores CMOS, como sensores de píxeles activos.

Hay varios tipos principales de sensores de imagen en color, que se diferencian por el mecanismo de separación de color:


1c

¿Cómo las imágenes en color se forman a partir de imágenes de blanco y negro en el sensor de captura?


1d

¿Qué hace el lente de la cámara? ¿Qué significa la longitud focal?


En las fotos a continuación, la cámara no se movió, pero la lente de la cámara se cambió como se indica.


2

¿Cómo se relacionan la apertura del lente y la profundidad de campo?


3

Describir que son píxeles, resolución de imagen y tamaño de la imagen.


4

¿Cuáles son los dos tipos de compresión de imagen?


5

Nombrar y describir tres tipos de formatos de imagen.


6

Dar los usos principales de la fotografía.


7

Tomar fotografías que muestren al menos ocho de las siguientes técnicas (utilizar fotografías comparativas para ilustraciones):


(algunos de estos detalles son copiados de la especialidades de Fotografía)


7a

Enmarcado


7b

Estabilidad de la cámara


7c

Dirección de iluminación – frente, fondo, de un lado


7d

Fondo borroso con objeto enfocado


7e

Regla de tercios


7f

Ángulo –nivel de los ojos, ángulo alto y bajo


7g

Nivel del horizonte


7h

Distancia de objeto – llenado del fondo


Algunas ideas para los Conquistadores:

  • Tome una foto de todo su grupo de jóvenes. Asegúrese de que haya algunos de pie y otros de pie/sentados frente a ellos. Luego, acérquese lo suficiente para que casi NO haya «espacio verde de fondo» a su alrededor. Le impresionará lo agradable que es tener una foto que muestre las expresiones en el rostro de todos.
  • Tome una foto de su mejor amigo mientras comen en un campamentoo en otro lugar. No intente tomar una foto de toda la habitación, sino acerque la parte superior del cuerpo y la parte superior de la mesa con el plato de comida. Ambos se reirán cuando vean la foto que muestra lo sorprendido que estaba su amigo por su foto «sorpresa».


7i

El uso de las líneas principales


Ideas para los Conquistadores:


7j

Exposición correcta – sub-exposición, sobreexposición y exposición correcta


7k

El uso de flash – distancia apropiada y objetos que reflejan


Algunas ideas para los Conquistadores:


8

Aprender cómo colocar fotografías en PowerPoint o en un programa equivalente. Crear una presentación mostrando las imágenes que se tomaron utilizando las técnicas anteriores.


9

Usando un programa de editar fotografías en una computadora, mostrar la capacidad de cortar, corregir el color, enfocar y ajustar el brillo/contraste a las fotografías.


10

Completar al menos tres proyectos fotográficos creativos en un programa de editar fotografías, tales como una portada de CD, una página de un álbum de fotografías, un collage, etc.


11

Tener una comprensión básica de los métodos y las técnicas de archivo fotográfico.


Referencias